
Summary
eazyBI is a cloud Business Intelligence service that also has a Jira app.
eazyBI has built-in adapters for Jira data. Using this adapter, it is possible to pull Timepiece -Time in Status for Jira data to eazyBI as well.
This document assumes the reader has basic knowledge about REST APIs and eazyBI configuration. The document itself is not an overall eazyBI or REST API tutorial.
Timepiece Reporting URL
While using Timepiece REST API, the client is expected to provide a single REST API call that includes all the parameters of the requested Timepiece report. Something like below:
Source Data URL
https://tis.obss.io/rest/list2?filterType=customJQL&customJQL=project in (ABC)&columnsBy=statusDuration&calendar=normalHours&fields=calc:projectKey,issueType&outputType=jsonSimplified&statuses=1,3,4,5,6
In this URL:
-
"tis.obss.io" is the domain for the Timepiece cloud service. Timepiece's REST API is served through this domain.
-
"/rest/list2" is the REST API endpoint that provides a "List" report. We want to pull each issue's data individually so it is appropriate to get a "List" report.
-
All the query parameters after the "?" character are the report parameters for the Timepiece List report.
-
You can reference this documentation page for details about how to modify each parameter of this endpoint according to your needs.
-
To overcome the complexity of setting all those parameters, you can prepare the report you want to get in Timepiece main reporting page, save it as a Parameter Set, and just reference the parameter set in your integration reporting URL.
-
-
Make sure you set "outputType" to "jsonSimplified".
-
It is recommended you explicitly provide a "statuses" parameter.
-
Timepiece will still return data if you don't supply this parameter but you won't be able to map all value columns if the first page of the results doesn't contain all statuses. Declaring the statuses explicitly overcomes this problem.
-
-
Make sure you don't use “startIssueIndex” paging parameter for “/rest/list2” endpoint. Required paging parameters will be added by eazyBI according to the pagination configuration below.
Data Source Definition
Adding a new Data Source to eazyBI
In the Jira Apps menu:
-
select eazyBI
-
Switch to Source Data tab
-
Click on the Add new source application button.

You can configure your adapter manually from scratch or you can start with a template and make changes on it.
Manual Configuration
To manually configure an eazyBI REST API data source for Timepiece, select the "REST:API" option in the "Add new source application" page.

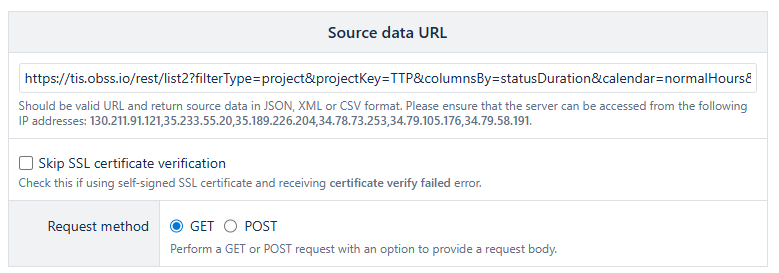
Source Data URL
You enter the Timepiece Reporting URL (mentioned above) as the "Source data URL" and select a "GET" request.
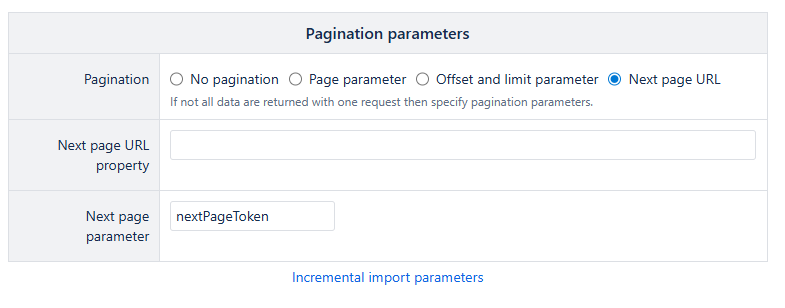
Pagination
By default, Timepiece fetches 100 rows of data per page. To access subsequent pages, you must send a new request using the "nextPageToken." To enable automatic retrieval of other pages, select the "Next Page URL" function from the "Pagination Parameters" section and enter "nextPageToken" into the "Next page parameter" field.
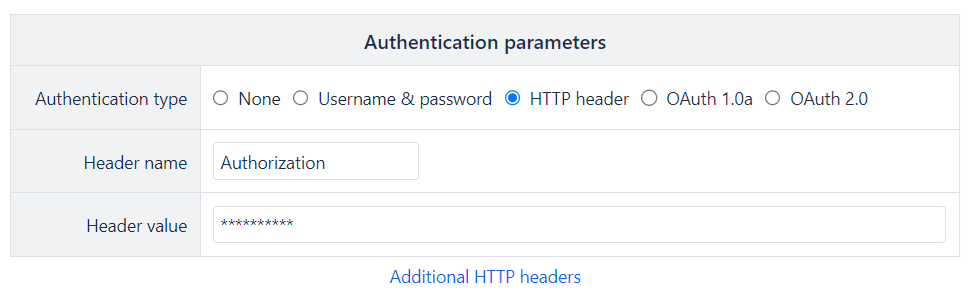
Authentication
For authentication, you'll first need to get a Timepiece REST API token as described in the API Settings page. After you get the API token,
-
For "Authentication type", select "HTTP Header".
-
For "Header Name", enter "Authorization".
-
For "Header Value", enter "TISJWT <your_api_token>" and replace the "<your_api_token" with the actual API token you created in the API Settings page.
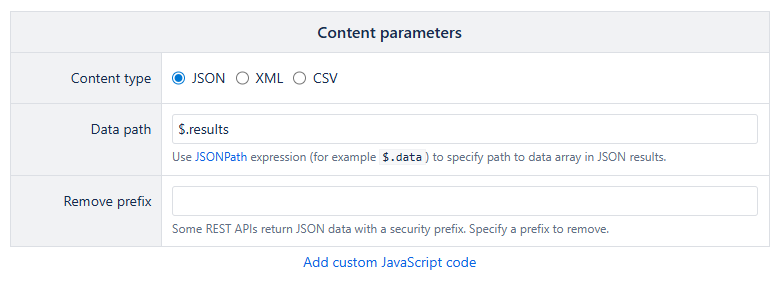
Content Parameters
-
For Content Parameters, set the "Content type" to "JSON"
-
For "Data path", enter "$.results". The report data is located under the "results" heading inside the JSON response.
Schedule
You can set the schedule according to your needs.

Importing Configuration
Instead of configuring the REST API data source from scratch, you can select the "Import Definition" option on the "Add new source application" page to import a predefined Timepiece REST API configuration and make necessary changes in the next step.
Timepiece sample easyBI data source definition with dimensions and measurements
{
  "application_type": "rest_api",
  "application_params": {
    "source_params": {
      "url": "https://tis.obss.io/rest/list2?filterType=project&projectKey=TTP&columnsBy=statusDuration&calendar=normalHours&viewFormat=hours&outputType=jsonSimplified&fields=calc:projectKey,issuetype",
      "request_method": "get",
      "pagination": "next_page_url",
      "page_parameter": "page",
      "page_parameter_in_body": null,
      "offset_parameter": "offset",
      "offset_parameter_in_body": null,
      "limit_parameter": "limit",
      "limit_parameter_in_body": null,
      "incremental": null,
      "incremental_stop_import": null,
      "authentication_type": "header",
      "authentication_header_name": "Authorization",
      "content_type": "json",
      "next_page_parameter": "nextPageToken",
      "next_page_parameter_in_body": null,
      "json_data_path": "$.results"
    },
    "columns_options": {
      "default_names": false,
      "hide_unmapped": false
    },
    "extra_options": {
      "regular_import_frequency": null,
      "regular_import_at": "",
      "time_zone": ""
    }
  },
  "source_cube_name": "TTP Status Duration",
  "columns": [
    {
      "name": "Key",
      "data_type": "string",
      "dimension": "Issue Key"
    },
    {
      "name": "Project Key",
      "data_type": "string",
      "dimension": "Project Key"
    },
    {
      "name": "Issue Type",
      "data_type": "string",
      "dimension": "Issue Type"
    },
    {
      "name": "Summary",
      "data_type": "string"
    },
    {
      "name": "Open",
      "data_type": "decimal",
      "dimension": "Measures",
      "dimension_member": "Open"
    },
    {
      "name": "Deleted Status Test (x)",
      "data_type": "decimal",
      "dimension": "Measures",
      "dimension_member": "Deleted Status Test (x)"
    },
    {
      "name": "In Progress",
      "data_type": "decimal",
      "dimension": "Measures",
      "dimension_member": "In Progress"
    },
    {
      "name": "Reopened",
      "data_type": "decimal",
      "dimension": "Measures",
      "dimension_member": "Reopened"
    },
    {
      "name": "Resolved",
      "data_type": "decimal",
      "dimension": "Measures",
      "dimension_member": "Resolved"
    },
    {
      "name": "Closed",
      "data_type": "decimal",
      "dimension": "Measures",
      "dimension_member": "Closed"
    }
  ]
}
Next steps
In the next step, you will be asked to map the data gathered from Timepiece REST API to dimensions and measures on your system.
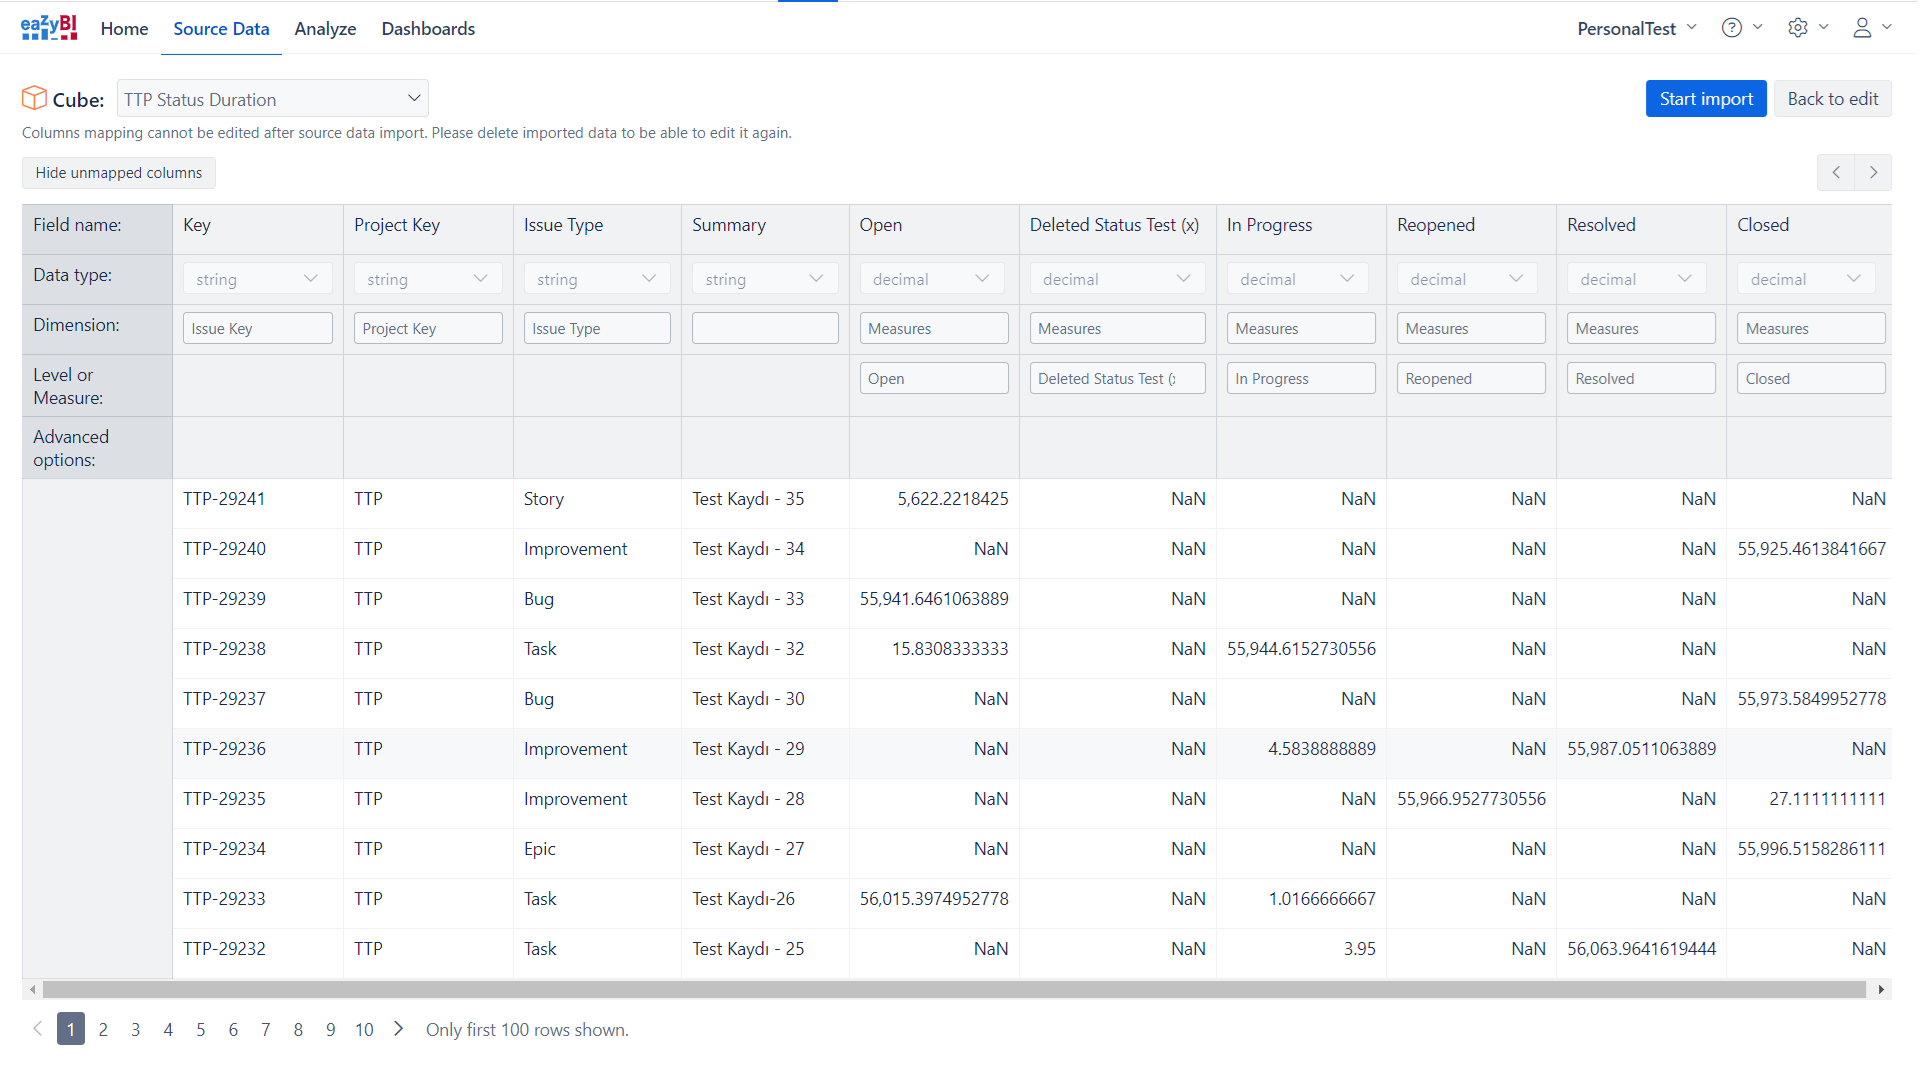
And, when you are done, click the "Start Import" button. You've successfully configured a data source for Timepiece in eazyBI.